Making Flexible Shape Patterns
Metal shaping discussion such as this, from Metal Shaping Master Wray Schelin can be reviewed online at the MetalMeet Forum.
From: By Wray E Schelin
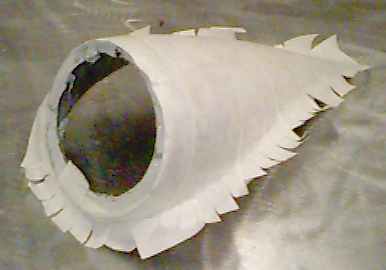
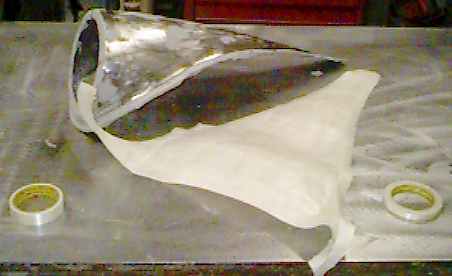
Ok as promised here are a series of pictures that I took today when I
made a paper shape pattern of a XK Jaguar headlight pod. This improved
and new method I have been searching for quite some time now. If you
make plain paper patterns, they are a real pain to get them to lay down
nice on the part or shape that you are copying. Magnets to hold the
paper down are of no use when working with aluminum, and they do a poor
job even with steel. I tried many different methods, but nothing is as
quick , cheap, and easy as this.
Last summer Jonathan Clowes ( a sculptor from NH) called me and asked
if I would help him in building an aluminum sculpture. In the process of
working with him I explained the problems and drawbacks of the plain
paper shape patterns. The next time he came to my shop he showed me the
solution to the problem. He and his helper ( Mark Goodenough) have
extensive molding knowledge,having worked previously together on many
sculpture projects made of fiberglass. They came up with the idea you
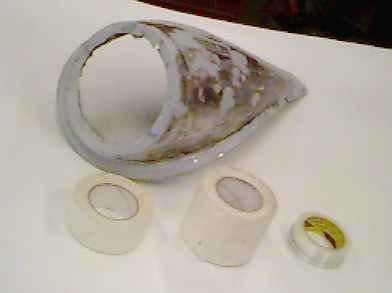
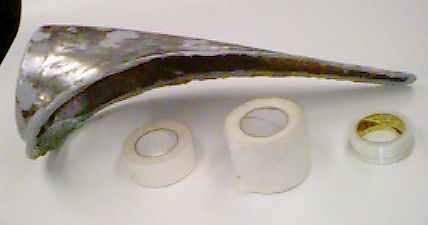
see here of using a special tape that is used by lettering companies
today called transfer tape. The neat feature of this tape is that it has
a diminished stickiness to it very similar to Post It notes. It looks
like thin masking tape and comes in 4' long logs that you have the
supplier cut to the widths that you desire. The cost is about $70.00 for
a four foot log and any sign painters or lettering supply house will
have it available. It is used to transfer vinyl letters off of the sheet
they are cut from and then transfers the letters to the surface ( truck
door etc.)
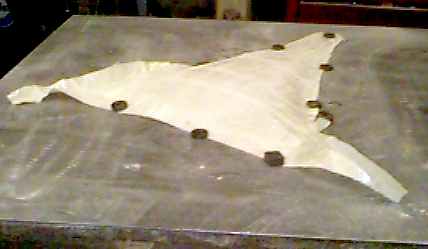
The two pictures you see below are two views of the headlight pod and
the tape.
If you follow the patterns information you will have the
pod. You will be able to work the metal in the folded open position,
which allows you access. Working a panel out of shape is one of the
fundamental "secrets or tricks of the trade".
And, could you elaborate on the following paragraph a little more please?
Also, I just thought of a material that I used back when I was a technical illustrator. It is called frisket paper. the spelling is probably wrong -- but it's close. This is a somewhat clear paper with an adhesive back. It is used to place over a photo or illustration so you can cut out an area to be airbrushed. It is quite expensive -- but might come in handy.
Wray Answers:
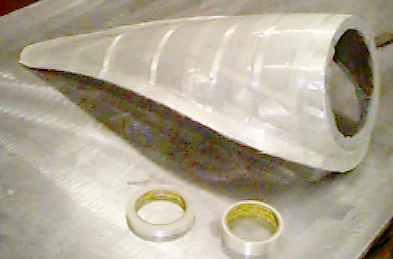
After you have the shape pattern made, you then flatten it out on top of
a piece of sheet metal . You then cut out the sheet metal following the
flattened pattern as your guide, leave at least 1" extra all around the
perimeter . unflatten the pattern ( sort of let it fill with air). the
metal will still be flat on the bench, it must grow ( stretch) to fit
the pattern. if you have a power hammer , you go over and wail the metal
with it , if you have a beater bag, you have to wail the hell out of the
metal . you have now begun the growing process ( the early stages of
metalshaping are not pretty, lots of lumps and bumps)
I usually raise the panel to 90-95% of it's finished shape by bashing,
then I planish it on my wheel to a finished fit for the last 5-10% of
the shape.
In the example of my headlight pod the edges need lots of very
concentrated stretching I do this concentrated edge stretching in my
Erco shrinker/stretcher, but you can also do this with a narrow headed
body hammer, holding the metal tight against an anvil or other heavy
hard block of steel.
> Also, I just thought of a material that I used back when I was a technical illustrator. It is called frisket paper. the spelling is probably wrong -- but it's close. This is a somewhat clear paper with an adhesive back. It is used to place over a photo or illustration so you can cut out an area to be airbrushed. It is quite expensive -- but might come in handy.
Wray Answers:
I'm not sure of frisket paper I am sure of the lettering transfer tape,
give it a try. I've tried many different combinations and formulas, I
have yet to find one as good as the transfer tape.
Desirable characteristics of the transfer tape.
1 -inexpensive This and other discussions can be reviewed online at the MetalMeet Forum
|