'
'
Lube Your Swingarm and Install Grease Fittings
'
'
Folks,
This is probably one of the easiest and most likely, the most time consuming mods/maintenance to do,
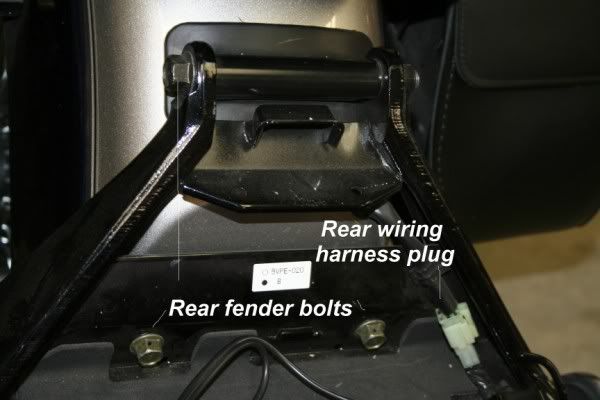
First lets start with taking the rear fender off. For a standard RoadStar, it's just a matter of removing the drivers seat . . . taking out the long horizontal bolt and nut, (17mm), and the 2 bolts, just behind the battery, behind the tool kit, (14mm). Let's take those 2 out first, (the 14mm ones). They normally have 2 rubber caps over the heads of the bolts. Just take the caps off and take them out.
'
'
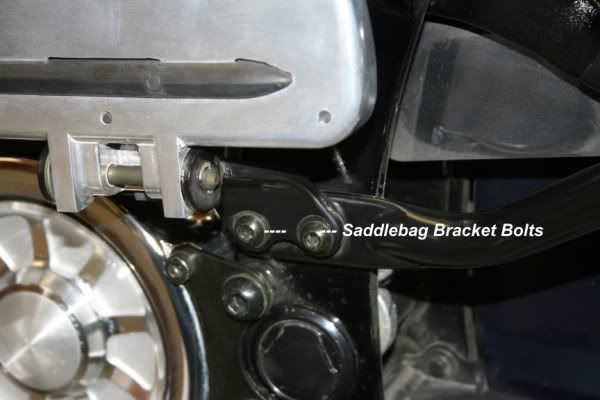
The Silverados have 4 extra bolts that bolts the saddlebag mount to the frame. 2 on each side and are the same bolts that also hold the passenger foot pegs on. Go ahead and take them out.
'
'
Before we take the long 17mm bolt out, let's disconnect the rear lighting connector. It's right there, just under the seat, at the rear fender. It's white in color.
Now you can wiggle the whole fender while pulling the long 17mm bot out. Most of the time the fender will stay in place because of the TIGHT fit of the subframe to the 'horn' mounts. Sometimes it 'does' slip down onto the tire. Got to warn ya , , , It's heavy with just the p-pad attached. If you have sadllebags and other accessories attached, then you might want to consider having a friend help you.
*The reason I like to take the fender off, is this; I don't like putting a bike up in the air to far on a jack , and , you can get to ther rear wheel and the swingarm with more ease.
Ok , , we've got the fender off , , 'or' , , we'll not take the fender off and we'll go to the next step,
We've got to get that rear tire loosened up, so; We loosen the rear axle, (27mm for the axle nut and 22mm for the axle bolt), or, 2 of the 10 inch adjustable Cresent wrenches is fine,
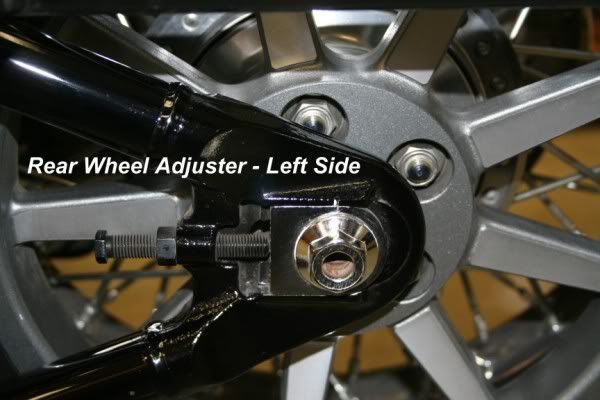
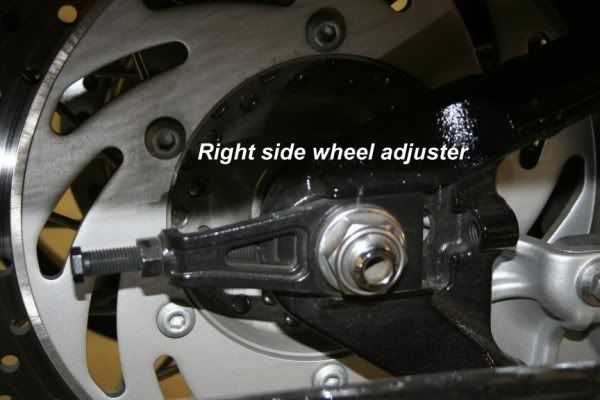
The axle adjusters are 12mm with a 14mm locking nut. Go ahead and loosen the locking nuts and back off the adjusters about 1/4 inch, (Don't worry, we'll go over adjusting the belt back to it's proper tension,
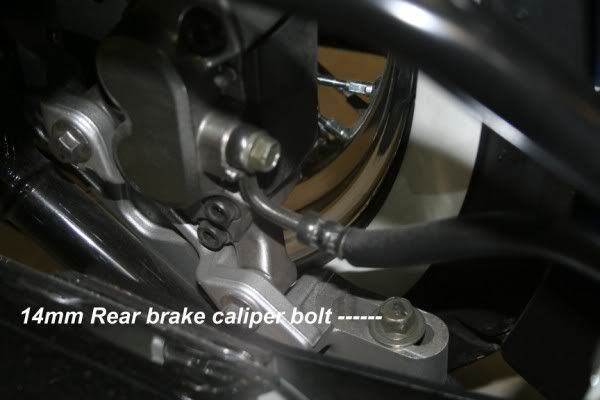
Let's NOT forget to loosen the 14mm bolt for the rear caliper mount. It's on the right hand side, on the 'inside' of the swingarm area. The 14mm bolt 'points' down and the caliper mount is 'slotted' where the bolt is in it. Just loosen it up. No need to take it out completely.
'
'
Now we get out the bike jack,
*Now, here's where it gets quite interesting,
*If you have no lower belt guard, then I normally just loosen the very rear 8mm bolt of the top chrome belt guard. That way, I can move the belt off the rear pulley. Either way, you don't have to. Just have to have enouhg 'slack' for the drive belt, to let the swingarm drop.
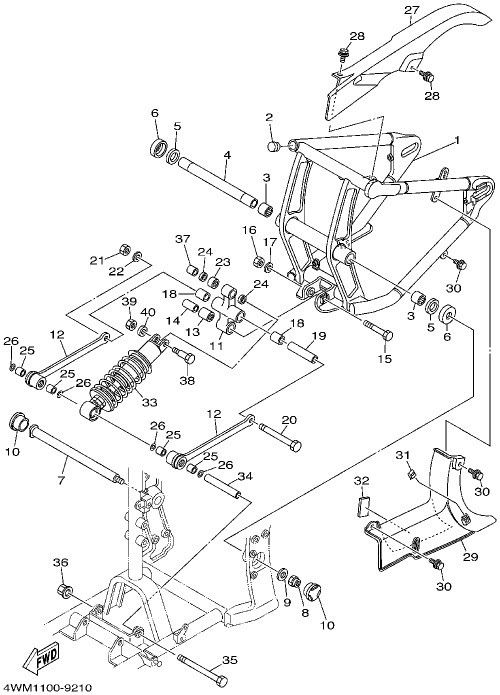
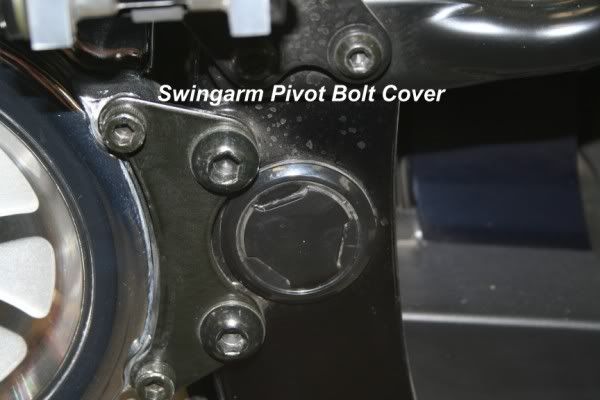
Ok , , in the pic below (bottom of page- Yamaha diagram), , see #7 ? That's the swingarm bolt. #10 are those black plastic covers, that cover the swingarm bolt and the swingarm bolt nut. Take them off. You'll need a 27mm socket for the swingarm bolt nut. The nut is ALWAYS on the left side of the bike/frame, for a stock RoadStar.
'
'
With the nut off the swingarm bolt, go ahead and 'tap' the bolt until it barely sticks out on the right side. The swingarm bolt head is rectangular and fits in a 'slot' in the right side of the frame. You'll 'see' once the bolt is pulled out a little.
Anywho's, go ahead and take the nut off. The swingarm ain't going anywhere until you pull the swingarm bolt out , , and we now get to do that,
While lifting up on the tire, (with the fender off, it makes it a lot easier,
Now, jack the bike up, (shouldn't be more than a few inches higher of where you have it now), until the external spacers, (#6) are showing. Those #6 spacers are actually 'cups'. Both cups will have a washer, (#5). Yepper, they're greasy,
We now can take out the internal spacer, (#4). It just slides right out. Place it with the cups. Clean the internal spacer, but the cups are up to you if you want to clean those.
Now , , to get the bad grease out and get the good grease in;
We'll need carb cleaner , engine degreaser, etc., to 'spray out' the residue of the grease that you've used a few paper towels to get the bigger portion out,
Nows a good time to check those bearings. Normally, they'll be alright. Just look for any flat spots. On the internal spacer, (#4), you'll 'see' where the bearings have made contact, (wear marks), on one side of the spacer. Normal. When we regrease the bearings and lightly grease the spacer, the spacer is going to be placed back 'into' the swingarm with the wear marks 'up'. We're just rotating the surface of the internal spacer to utilize the tighter side for the contact to the bearings,
Ok , , with a good moly-lithium wheel bearing grease, we FORCE the grease into the little rollers of the bearing all the way around into the bearing. Just 2 fingers, (yep , , it's gonna get messy,
*Before we put the internal spacer back in , , , , now is the time to really think about putting a grease fitting in. Jim in Minnesota, (Da Ice Man), has his grease fitting mounted in the top of the swingarm tube. Normally, I mount it in the bottom. I just put one of those small rubber caps on, that you find on the brake bleeders,
*** Folks, I've been running my 01 Midnight with the 'flip' soo long that I forget about the grease fitting getting in the way , IF, you have the stock relay arm in it's stock position. You can't really put a grease fitting in the bttom tube of the swingarm, IF, you're running the stock relay arm. The realy arm has the possibility of hitting the grease fitting. Mounting it off-center is fine.
*With the internal spacer out, it's much easier to drill and tap for the grease fitting. I like to use the small straight grease fittings and try to get it close to the middle of the swingarm tube. Also, you can 'see' if there's any metal chips. You can get those out with a piece of paper towel at the end of a long screwdriver, to get it/them out.
*You'll need a tap for the 1/8th shank grease fitting. They can be bought individually and are reasonable in cost. The grease fittings come in a package of 3 or more and are reasonable also.
Ok , , we greased the bearings , , we put in the grease fitting. Now, we lightly grease the internal spacer and gently slide it back in with the wear marks 'up'. Remember, we're just rotating the wear portion. Oh yea , , , this is NOT anything to worry over unless the wear marks are REAL deep and have 'deep ripples' in the spacer. If that's the case, I really would consider replacing the bearings and the internal spacer ! ! ! Smooth wear-marks are normal.
Now, remember those cups and washers,
Let the jack down SLOWLY, till the swingarm bearing tube, ALMOST aligns up with the frame, (about an inch from full allignment). Slowly pick the back tire up while pushing in the swingarm bolt, from the right side.
As the bolt goes into the frame, that rectangular head of the bolt fits 'into' a rectangular slot in the frame hole. Make sure it's in there. On the left side you can put the washer and nut back on and tighten. *The book calls for 90 ft lbs of torque. With a torque wrench you can tighten it, or you can just FIRMLY tighten it, if you want. I've put many back together without a torque wrench and it's up to you to use one or not. Your call,
'
'
'
Now, like we discussed before, you can take the fender off or you don't have to. To me, it's just much easier, to get to stuff with the fender off,
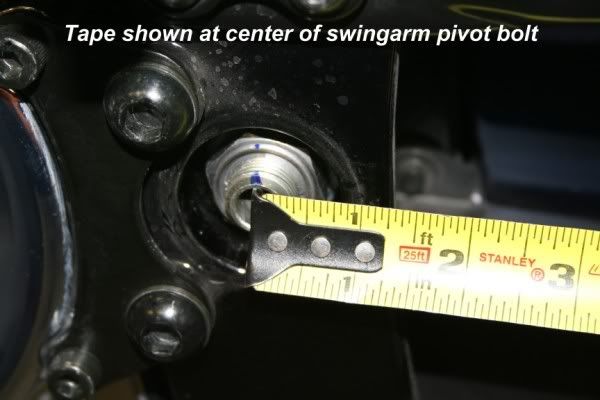
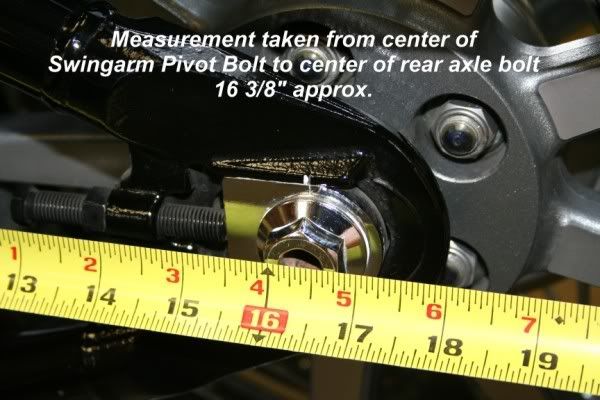
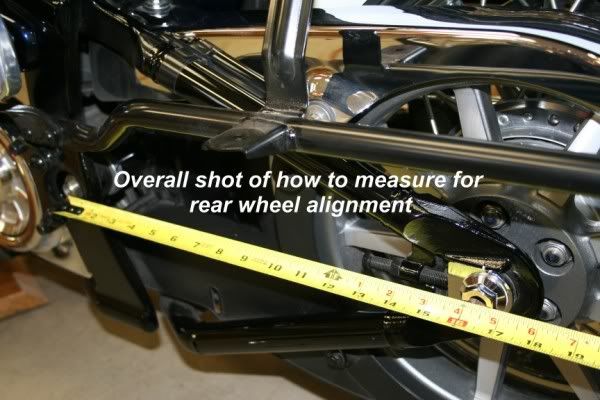
Aligning and tightening the rear wheel is nothing more than measuring EQUALLY on both sides of the bike, from the center of the swingarm bolt to the center of the rear wheel axle. It 'should' be between 16 1/4 to 16 1/2 inches, from center to center.
'
'
'
'
You want the belt to be tight enough, (ON THE GROUND, when you do the adjustment), to NOT be able to twist the lower, half-way point of the belt, to NO MORE than a 45 degree twist.
Just be sure to tighten everything back up and please don't forget about the 1 single, 14mm rear caliper mount bolt.
You can now put grease 'into' the grease insert. WATCH as your putting in the grease and the 'cups' of the swingarm bolt. When you 'see' it just barely coming thru the 'cups', , , STOP. You're now good to go for about 50,000 miles or more, depending on weather, rain, moisture, etc. If you choose you can use a marine grade wheel bearing grease, if you live in a wet climate,
Hope this helps some folks.
Joel (Odo) and photos by Kevin (RidaV)
*Oh yea , , , as the disclaimer goes; I don't know your mechanical abilities, sooo , , , if you are UNSURE about any of this, then , , PLEASE, do NOT do it ! ! The WHOLE swingarm is just attached by 2 bolts , , , , #7 and #35 ! ! PERIOD ! ! #7 being the swingarm pivot bolt and #35 being the front shock mount bolt.
'
'